
AS400 OPTION 4135 – DS ORDERS WITH MISSING PO NUMBERS
![]()
The objective of this option is to show you all Direct Ship sales orders that either do not have a PO at all or not all lines are tied to a PO. You can create a PO directly from the menu option. You can also ‘Link’ lines on your sales orders to the line on the PO where they are not currently tied. If you have more lines on your sales order than you do on your PO (maybe you edited it after creating the PO), you can add them to the PO and link them with just a couple clicks. Below is a screen shot that shows orders that have no PO number at all.
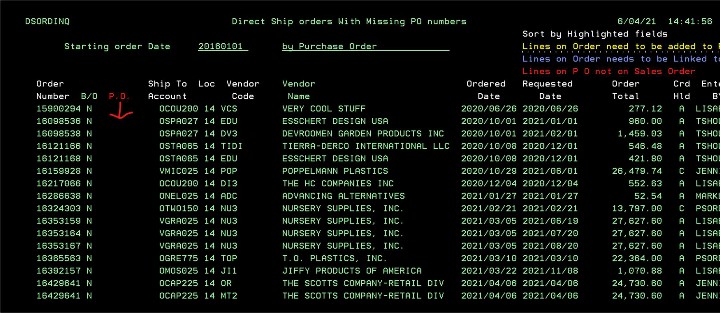
There are a couple of ways to navigate this screen.
#1 – Any column header that is in WHITE, you can double LEFT click on anything IN that column to sort it. For instance, if I double click on the EDU in the Vendor Code column, the entire screen will resort in ascending alphabetical order by Vendor Code.
If you double click a Vendor code again, it will resort it in descending order. #2 – At the bottom of the screen, you’ll your menu options; only 2 are visible

The F24 function will show you all the additional options
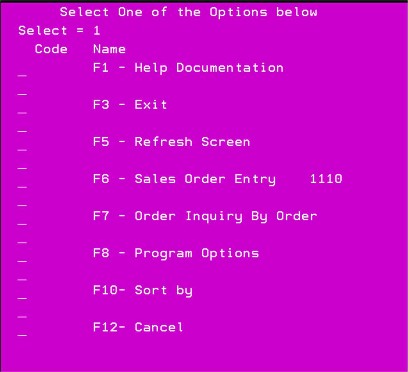
The F8 Option has more nested functions
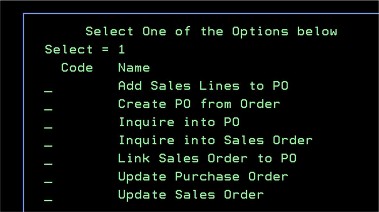
If you click on the line you want to create a PO for, you can click F8 to see your options to create a PO for the line you’ve clicked on.
If you put a ‘1’ in the CREATE PO FROM ORDER field and click ENTER, a new PO will open (just like you normally see in 4110) and everything is already populated. All you have to do is check everything and then F5 to save.
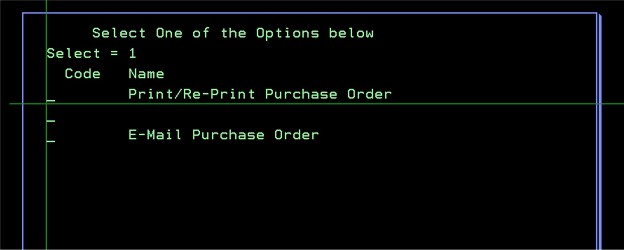
When you F5 to save the PO that you’ve created, you’ll be taken to a screen giving you the option to PRINT or EMAIL the PO. To do so, you need to put a ‘1’ in the respective selection and click ENTER.
o
If you do not make a selection and just click ENTER, it will take you back to the main screen and the order will no longer be listed because you’ve just created the PO and all lines are tied.
#3 – if you have a line that is in bright yellow – this means that you have lines on your sales order that are NOT currently on your PO.
To add these lines to your PO, you can either click F8 or double RIGHT click on the order you’re working with to get the options dialog box shown above and place a ‘1’ in the ADD SALES LINE TO PO.
After you click ENTER, you will be taken to the active PO. All you have to do is click F5 to save it. Now the additional line is added to the PO and it is linked.
#4 – if you have a line that is in bright blue – this means that you have lines on your sales order that are on your PO, but they’re not tied or linked together
To correct this, either double RIGHT click on the row or the F8 key and place a ‘1’ by LINK SALES ORDER TO PO and click ENTER
Review the order and click F5 to save
#5 – if you have a line that is in bright red – this indicates that you have a line on your PO that is not on your sales order. Unfortunately, there’s nothing more we can do in this menu option.
The reason we can’t add it to the sales order is we do not have a selling price. At this point, you’ll have to open the sales order by doing an F8 or double RIGHT click to get to your options and select UPDATE SALES ORDER.
Here you can add the line to your sales order manually because you will have to designate a selling price
After the item is added and you’ve submitted the corrected order, when you go back to your main screen, this line will now be in BLUE indicating that the line is not ‘linked’ to the PO.
See option #4 above to simply link the new item to the item on the PO
#6 – if you just want to inquire on either the sales order or purchase order, click F8 or double RIGHT click to get to your options and select INQUIRE INTO PO or INQUIRE INTO SALES ORDER
These will take you to what you currently know as 4910 or 1910 respectively.
#7 - if you need to add something to the sales order or the purchase order, click F8 or double RIGHT click to get to your options and select UPDATE PURCHASE ORDER or UPDATE SALES ORDER
These options will take you to what you currently know as 4110 or 1110 respectively. Back on the main screen, the other options you have in the menu selection at the bottom are:
F6 ADD NEW SALES ORDER
This is exactly that, it opens Option 1110 to enter a sales order from scratch
F2 CREATE PO
This option creates a brand-new PO. It can be a warehouse PO or create one manually for an existing sales order (The Create PO in F8 option above does all the work for you)
F7 INQUIRE INTO NON-LISTED SALES ORDER
This takes you to what you currently know as Option 1910. You have to know the sales order number in advance, but just type it in and click ENTER and you can view everything on the sales order