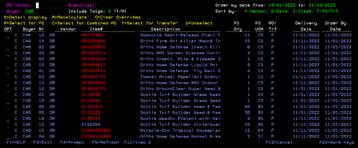
Screen Number - 4155
The Smart PO system calculates
inventory requirements for BWI sold items.
The requirements are based on current orders, future orders, safety
stock requirements, and projected orders based on sales history. Availabilty of items is based on on-hand
inventory, current Purchase Orders, and transfers from other warehouses. The available inventory is compared to the
current and expected requirements and recommendations are made on how much
inventory is needed to acquire. The
system may recommend to transfer inventory from another warehouse if available,
or creating a new Purchase Order to a vendor.
Note: With new procedures for inventory management,
all requirements all calculated based on the total availability and
requirements for each Division as a whole.
All quantities used to calculate the requirements are a summarized
number for all locations within a division.
And as such, only the primary division locations will be listed on the
display. This method gives better
control over inventory for a division, including the division twigs, to the
division manager. The division manager
can then decide when and where inventory needs to be moved within his division. And purchasing agents are only required to
manage inventory for the division as a whole, not each individual location.
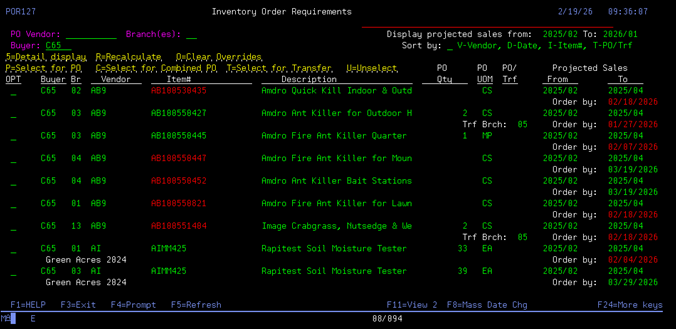
Exception: Vendors identified as Exception Vendors for a
location are managed separately for that location. Exception vendors sell special inventory
items are are better served by a particular location. The available quantities and requirements are
calculated separately and are not included in the Division summarized
requirements calculations. The Exception
Vendors will be displayed in Pink on the
requirements list.
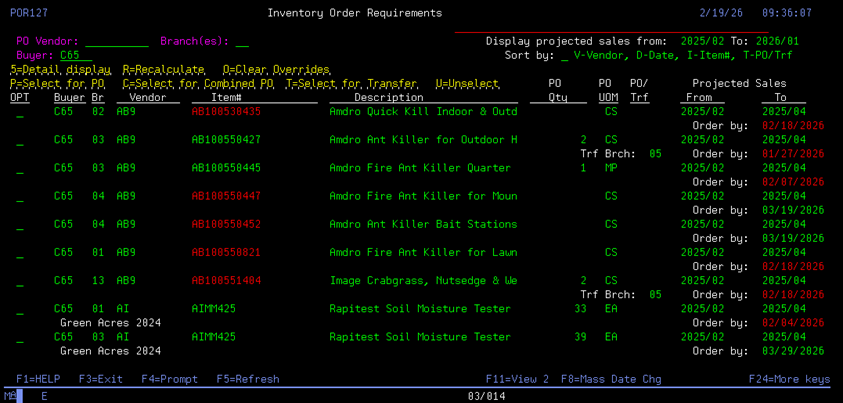
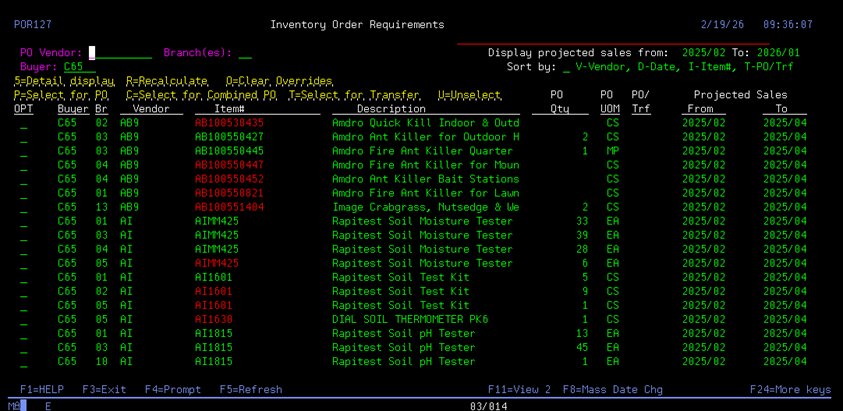
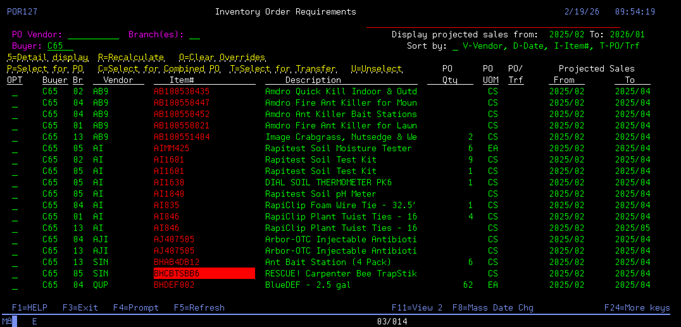
The initial display of the suggested
items has the extended display. F11
will switch the screen to single line display.
This will display more items on each page of the screen.
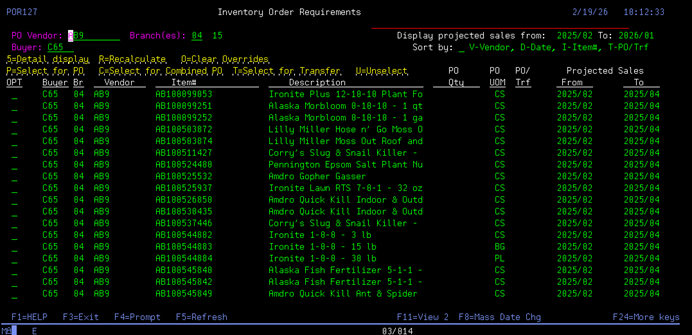
You can filter it by vendor and by branch.
The
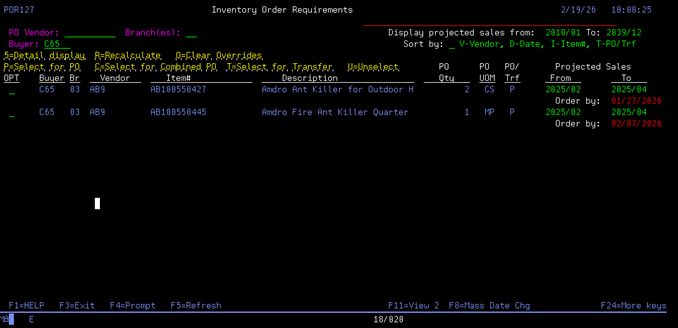
Projected Sales From and To dates in the top right corner can be adjusted. This
is the date range that the initial screen will display the requirements. It defaults to the current month from last
year to last month.
Additional
note: The order by date is the date the program generates, that you need to
order by in order to reach the needed delivery date. This is calculated based
on the lead-times in the system. It will be highlighted red if that date is
before today’s date, indicating that it should already be on order.
The screen will default to your buyer number, and it will only show you items under your buyer number. You cannot see other buyers’ items.
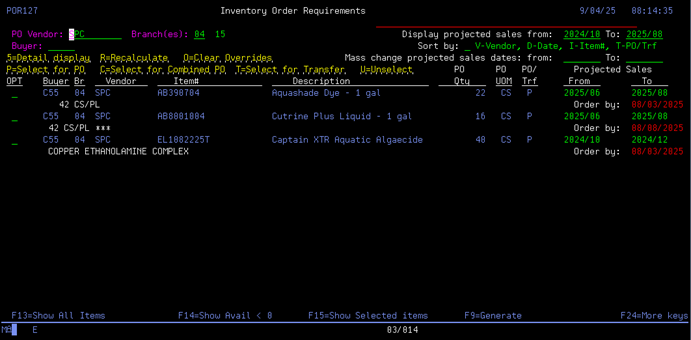
You can sort by V-Vendor, D-Date, I-Item, and T-to separate the P's (purchases) from the T's (transfers).
On each items line you can: 5-Detail display, R-Recalculate, O- Clear Overrides, P- Select for PO, C- Select for Combined PO, T- Select for transfer, and U- Unselect.
Additional notes:
If
the quantity available is less than 0, the item number will be red indicating a B/O.
If
the item is for a regional warehouse, the branch and vendor code will be hi-lighted
(white).
If
the branch and vendor code are displayed in pink,
that vendor is an Exception vendor for that particular warehouse.
If
an item is marked as Obselete or Inactive, the item number will be displayed in
Reverse image.
If
an item is marked as Obselete or Inactive, and the quantity available is less
than 0, the item number will be displayed in red
and Reverse image.
When
a line is selected to be included on a new PO or Transfer, the entire line will
be blue.
(Some
colors may vary depending on the setting you have your AS400 session set
to.)
Function
Keys:
F11 – switches
between item single line display and extended data display.
F14 -
will show Total Available quantities less than 0. These will be your
backorders that need to be covered ASAP. These item's will also be
highlighted Red. F13 – The
initial requirements screen will only display items that have suggested
Order/Transfer quantities, OR items that have negative available quantity
(Backordered, in Red). F13 will
show ALL items including those that the suggested Order/Transfer is 0.
F15 - will show all items that you have selected for a Purchase Order or
Transfer.
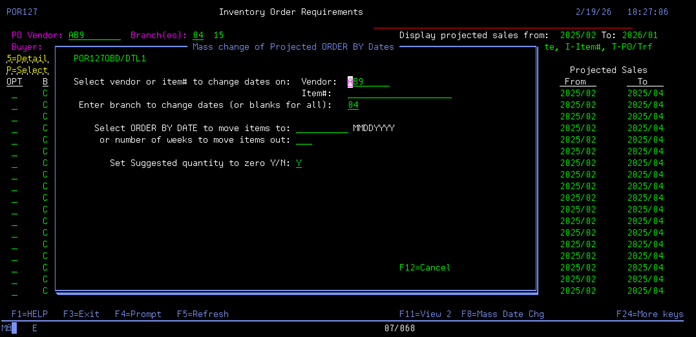
F8 –
Mass change of recommended Order By Dates. If a
user does not want to look at the requirements for an item until a later
date, they can change Suggested quantity to 0 and set the recommended Order
date to a future date. This way, the
display will ignore any items with 0 requirements, and the 0 requirements
override will remain in effect until the override Order Date is
reached. Then the override will be deleted and the item will return to the recommendations routine. F8 will
allow you to change the Order date for all entries for an item, or all
entries for a specific vendor. This
will allow you check the recommendations for that item or vendor at a later date. Press
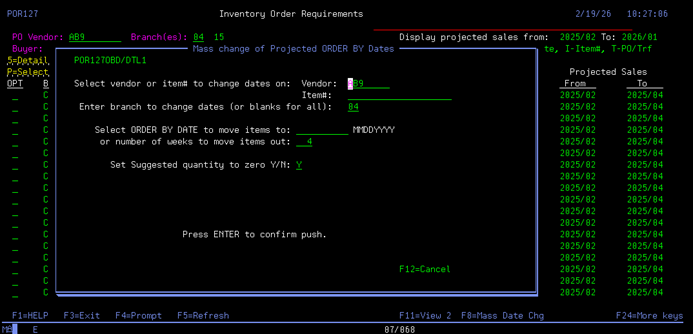
F8 and the window to select the item or vendor will display.![]()
This
is the window to make a Mass change of recommended Order By
Dates. The
vendor code and branch will default to the vendor and branch that was
selected on the browse screen. They
can be changed by keying over the defaults, or the vendor and be removed
and an item# be entered. Only
items for vendors under your Buyer Code will be changed. Enter
a date you want to push the requirements to, or
enter a number of weeks to push the requirements
out. Then
enter a Y or N to clear the Suggested quantities. Clearing the quantity will prevent
showing the item(s) as current requirements. Press
ENTER to proceed.
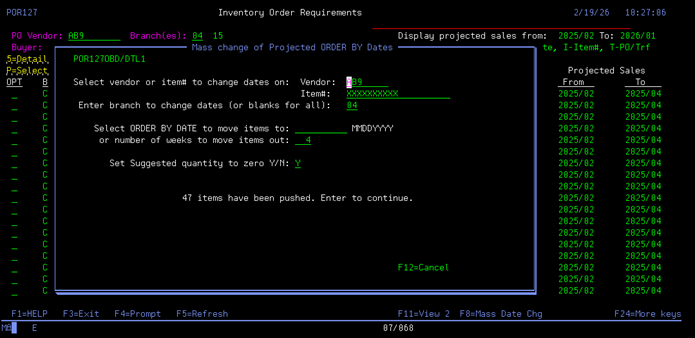
A
message will display to confirm your selection. Press
ENTER to process the Order date changes, or F12 to cancel the changes and
return to the browse screen.
When
complete, the window will display the number of changed items. Press
ENTER to return to the browse screen.
F9 - will generate the PO and transfers based on the lines you have
selected for a new Purchase Order or Transfer. . ![]()
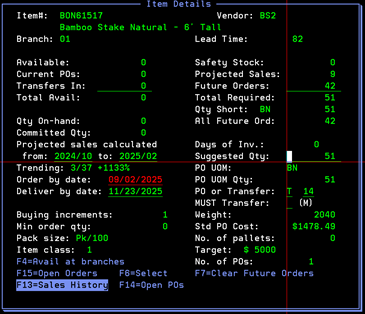
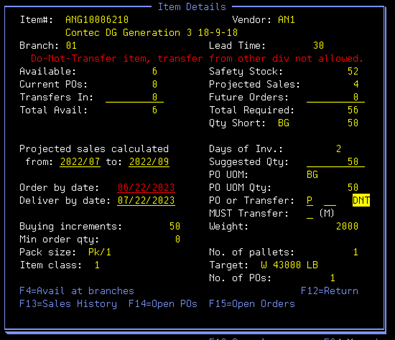
This breaks down the formula that is being used to suggest orders or
transfers. You can see what is available, current PO's, and transfer's in
place, giving you the total available inventory. This is the number used to
highlight items on the main screen that are less than 0. The order by date can be adjusted and then the deliver by date will
recalculate. The rest is information about the item in relation to creating a PO.
Buying increments, minimum order quantity, pack size, item class, current
weight of the PO, UOM quantity, number of pallets, target, and number of
PO's. The calculated Available, Current PO, Total Available, Projected Sales, Future Orders, Total
Required, and Suggested quantities are based on the total quantities for
all locations in this division. Note: When a vendor is designated as an Exception Vendor for a
branch, the quantities for that branch are NOT included in the division
total calculations. The requirements
for this branch/vendor are calculated and listed separately on the display. .
From the detail display screen:
![]()
![]()


Safety
stock is a calculated figure based on Daily Average Sales for the item (see
Safety Stock calculation below). It
recalculates at the beginning of each month and is only for Class 1 items. Projected sales is based on past sales history or expected future
sales. (see Projected Sales
calculation below). Projected sales
numbers are only used in requirements calculations (and displayed) for
Class 1 and 2 items only. Future orders only show orders with ship dates within the next 90 days. The next part of the formula takes the total required minus the total
available to give the quantity short.

Days of inventory is calculated by monthly average divided by days in
the month. Then the total available is divided by that number, to tell you
approximately how many days of inventory are in stock. Suggested quantity is the same as quantity short. This is the number
that will be used for transfers. This can be adjusted. PO UOM and PO UOM quantity are based on the buying increments in the
system. If you change from a “T” to a “P” this is the quantity that will be
added to the PO. PO or Transfer is the suggestion on what action to take for each
item. It can be switched between the two. The next blank is the transfer
from location. In the next blank you can make it a Must transfer. A
transfer to cover backorders will auto generate an “M” for a must load.

The Trending line gives a quick reference of how this item’s
sales are performing compared to last year.
The first number displayed is the total of the past 3 months sales for
last year, the second number is the total of the past 3 months sales for
this year. Then a percentage of
change (either up or down) is displayed. ![]()

Function Keys:
The requirements Detail Display has the option to recalculate the
Required quantity by removing the Future Orders quantity. F7 will zero the Future Orders quantity.
This can be useful if the Future Orders may be overstated by special
orders. F19 will replace the Future Orders quantity (for the next 90 days) with
the All Future Orders quantity. This will allow the buyer to forecast
sales out When the Future Orders quantity is removed from the display, the Suggested quantity, and PO UOM
quantity is re-calculated to reflect the new Requirements. Pressing F7 again will return the Future Orders quantity to the display
and Requirements quantity to the original quantity.![]()
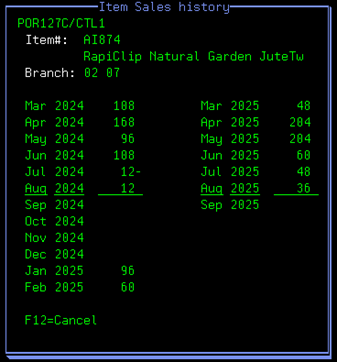
F13
- Shows a 12-month history for that item and location. If
the F13=Sales History command is shown in Reverse image, then at least 1
month of the history has a negative sales quantity.![]()
The
display shows the family history including the main division and twigs. Ex.
History for 02 = 02 + 07.
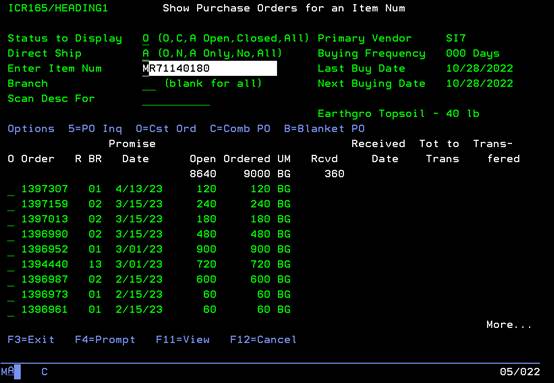
F14 -
takes you to screen 4920 which is PO inquiry by item number.
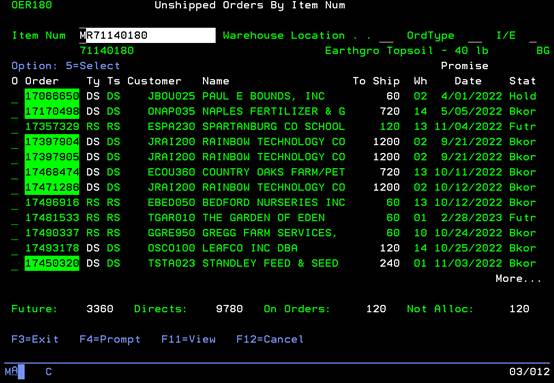
F15 -
takes you to screen 1960 which is customer order by item number
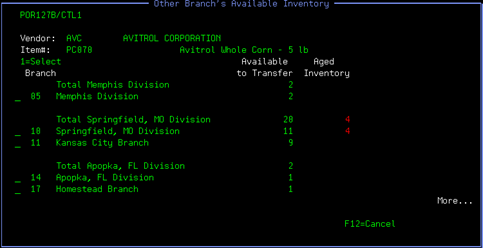
F4 - Will
show you all the inventory across the company that is available to be
transferred. This display window will list the total
available quantity at the displayed division, if the division has available
inventory. Then the individual
quantity of each location is listed under the division total. A
division will be displayed if that division has enough inventory available to
cover the required quantity of the branch being checked. If the
branch being checked does not have a suggest quantity, then all branches
with available inventory, OR has any Aged inventory on hand will
be displayed. If a
branch location has inventory available for transferring, that location can
be selected by entering a ‘1’ in the selection column and press
‘ENTER’. This will set the Transfer
From location as the suggested transfer location. Available
to Transfer is
calculated as: Total Available (Available +
Current Pos + Transfers In) - Greater
of: 1) Projected Sales (Sum of
monthly sales for next n months sales based on the next n months
sales from last year. (n = determined by item Lead Time.) (Sales Totals are reduced by the total
quantity of Future Orders for that time period.) (Projected Sales quantity is rounded up to
the next Minimum Order Multiple for that item.) Class
1 or 2 items only.)) Or
2)
All Future orders quantity.
Creating POs:
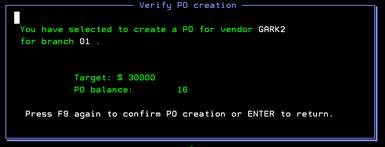
 Once you have reviewed all the
items in the main screen, place a “P” next to the ones you want to put on a PO.
Hit F9 to generate. You will see a pop up letting you know the vendor and
division. If those are correct, hit F9 again. A warning will appear on the pop
up if the quantity selected does not reach the PO target, but will still let
you create the PO.
Once you have reviewed all the
items in the main screen, place a “P” next to the ones you want to put on a PO.
Hit F9 to generate. You will see a pop up letting you know the vendor and
division. If those are correct, hit F9 again. A warning will appear on the pop
up if the quantity selected does not reach the PO target, but will still let
you create the PO.
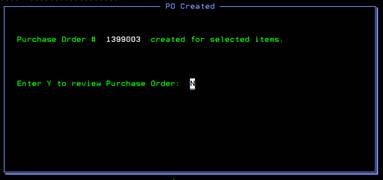 You
will get another pop up with the PO number and option to review or print.
Review takes you to 4110 so that the PO can be edited but will be auto
populated with the defaults for that vendor and dates from the smart PO system.
You
will get another pop up with the PO number and option to review or print.
Review takes you to 4110 so that the PO can be edited but will be auto
populated with the defaults for that vendor and dates from the smart PO system.
If you select “Y” to review it will take you to screen 4110 to review and edit the PO.
Creating Combine POs:
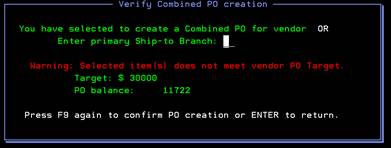 This generally follows the same steps as creating a
PO. Once you have reviewed all the items in the main screen, put “C”
next to the ones you want to put on a PO. (Make sure they have a “P” in the
PO/Trf column, or it will not be added to the PO.) Hit F9 to generate. You will
get a pop up asking which branch you want to be the primary ship to location.
Once selected, hit F9 again. A warning will appear on the pop up if the
quantity selected does not reach the PO target, but will still let you create
the PO.
This generally follows the same steps as creating a
PO. Once you have reviewed all the items in the main screen, put “C”
next to the ones you want to put on a PO. (Make sure they have a “P” in the
PO/Trf column, or it will not be added to the PO.) Hit F9 to generate. You will
get a pop up asking which branch you want to be the primary ship to location.
Once selected, hit F9 again. A warning will appear on the pop up if the
quantity selected does not reach the PO target, but will still let you create
the PO.
This takes all the items you have selected and puts them on a PO to the primary ship to location you selected. The total quantity of each item is added up then broken out through 4210 with transfers to the locations you need the inventory for. All of this can be reviewed and adjusted in 4110.
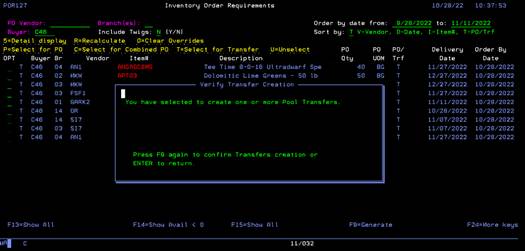
Creating Transfers:
 Once you have reviewed all your
items in the main screen, enter a “T” next to the ones you want to put on a
transfer. Hit F9 to generate.
Once you have reviewed all your
items in the main screen, enter a “T” next to the ones you want to put on a
transfer. Hit F9 to generate.
You
will see a pop up letting you know you have selected items for Pool Transfers.
Hit F9 again.
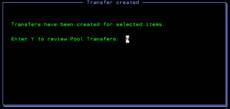 The
next pop up lets you know transfers have been created, and you have the option
to review. If you select “Y” to review, it will take you to screen 3611 to
review and edit the transfers.
The
next pop up lets you know transfers have been created, and you have the option
to review. If you select “Y” to review, it will take you to screen 3611 to
review and edit the transfers.
Notes
regarding Do-Not-Transfer items:
If an item is marked in the item master as Do-Not-Transfer, this item cannot be
transferred between different divisions.
Transfers can still be made within the same division.
When
calculating whether to transfer or purchase a necessary item, a Do-Not-Transfer
item will not suggest a transfer outside of the requiring branch. If the only inventory available for transfer
is outside of the requiring branch’s division, a new Purchase Order will be
suggested.
If the
user tries to select a transfer branch in the detail display screen that is
outside the requiring branch’s division, a warning is displayed and the
selection is ignored.
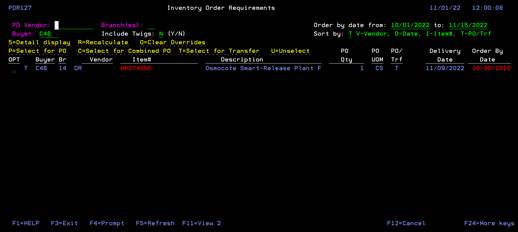
A
Do-Not-Transfer item is identified by DNT next to the PO or Transfer field.
![]()
If the
user selects a Do-Not-Transfer item to be included in a Combine PO and the
Ship-to branch entered is outside of the required items division, a warning is
displayed when the Purchase Order is generated to notify the user and the
Purchase Order creation is canceled.
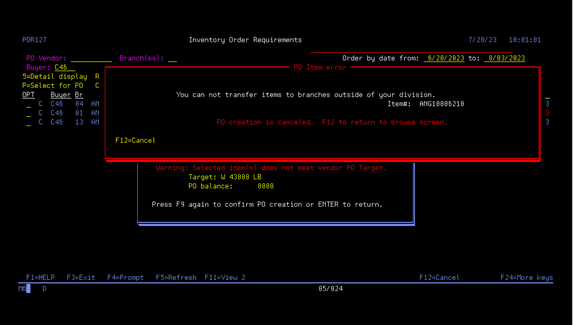
The item
selected can then be un-selected and the Combine PO created.
Important
notes:
Please
make sure the setup of your items is correct. Having the correct buying
increments, class, lead time, etc. are essential for the success of this
program. If the setup is wrong, then the suggestions it makes will be wrong.
Please update these when they change, the most critical being lead times. The
entire calculation will be wrong if the lead time is incorrect.
This
system is meant to be a suggestion. You will still need to review and agree
with what it says. It is not meant for you to go in and do exactly what it
suggests every time. There is human knowledge that cannot be programmed into
the system. Your product knowledge allows you to know when it may be suggesting
too much or not enough.
Safety
stock can be turned on and off based on the vendor. So be sure to work with the
Marketing Managers on these settings. You should know by working with your
lines every day which ones need safety stock included or not.
All
the information and calculations on the screen will be recalculated and
refreshed every hour. This is to catch any manual transfers entered, PO’s
created, customer orders entered,
and
PO’s received. This gives you as “Real Time” information as possible.
Formulas
for Smart PO calculations:
Safety
Stock calculations:
Safety
Stock:
Daily Average Sales for the Next 3 months of sales based on the next 3 months
sales from last year
* item Lead Time.
(If no Lead Time is established for the item, use the default Lead Time
for the item’s primary vendor.)
Rounded up to the next
Minimum Order Multiple for that item.
(Only for class 1 or 2
items; Item status = ‘A’.)
Runs on first day of
each month.
Lead
Time calculations:
Lead
Time:
Based on the last 5 receipts for an item, find the average days to receive
(Received Date - Order Date).
Based on receipts
within the last 18 months.
(Default of average 30
days if no receipts.)
Smart
PO Requirements calculations:
Available
Quantity:
Total quantity on-hand - Total quantity Allocated (Allocated Quantity +
Quantity Short + Quantity Backordered from IBRBIN file.).
Current
Pos:
Total Open PO quantity + Total Combined Inbound PO quantity – Total Combined
Outbound PO quantity.
Transfers
In:
Total Open Transfers In quantity + Total Pool Transfers In quantity.
Total
Available:
Available + Current Pos + Transfers In.
Safety
Stock:
(Safety Stock Quantity ÷ Days in current month) * Lead Time.
(Lead Time from Buying
Controls file IBRGG – 4310; or Lead Time Exceptions file POSMARTLT).
(Safety Stock is
included in requirements calculations for Class 1 items only,
and the Include Safety Stock flag from file
VNDUDD must be set to ‘Y”.)
Projected
Sales:
Sum of monthly sales for next n months sales based on the next n months sales
from last year.
(n = Projected
sales calculated from detail display.
Determined by item Lead Time.)
(Sales Totals are reduced by the total
quantity of Future Orders for that time period.)
Projected Sales
quantity is rounded up to the next Minimum Order Multiple for that item.
Future
Orders:
Total quantity of Open, Warehouse, Type ‘F’ orders.
Orders with
Future Date from Current date to next 9 months.
All
Future Orders:
Total quantity of ALL Open, Warehouse, Type ‘F’ orders.
Total
Required:
Safety Stock quantity (Class 1 items, and Use Safety Stock flag (from file
VNDUDD only) = ‘Y’ +
Projected Sales
quantity (Class 1 and 2 items only) +
Future Orders
quantity.
Quantity
Short: Total
Required - Total Available.
Days
of Inventory: Available
quantity ![]() (Safety Stock quantity ÷ 20). 20 = Daily Average.
(Safety Stock quantity ÷ 20). 20 = Daily Average.
Suggested
Quantity: Same
as Quantity Short (this field can be user overridden).
PO
UOM Quantity: Suggested
quantity converted to PO Unit of measure.
AND rounded
up to next full PO Unit of measure quantity, if necessary.
AND rounded
up to Buying Increment, if necessary.
AND
increased to Minimum Order quantity, if necessary.
Order
by Date: Calculate number
of Days to order: Days of Inventory –
Lead Time. (Maximum 365 days).
Calculate Order
Date: Current Date + Days to order.
(If Order
by date is older than 1 month before today, force to 1 month before today.)
(If
Available quantity is Negative, force Order By date to Current date)
Deliver
by Date: Order by Date +
Lead Time.